If you are a caseworker for contracts you can read about how to process or create monthly contracts here.
Step 1 – Who
Step 1 is the same for all types of contracts. Read more about step 1 under Create new or process contract.
Step 2 – Contract
In Step 2 you enter contract information, organisational affiliation, salary and information about the position. Additionally, you can change cost allocation and enter special conditions.
If you are processing a contract proposal from an orderer, the fields for "Contract type", "Organisational unit" and "Cost allocation" will be pre-filled with the information the orderer has entered in the corresponding fields. If the orderer has entered information in the "Task" field, this will also be pre-filled. As a caseworker for contracts, you can modify the information in all fields, including those pre-filled by the orderer.
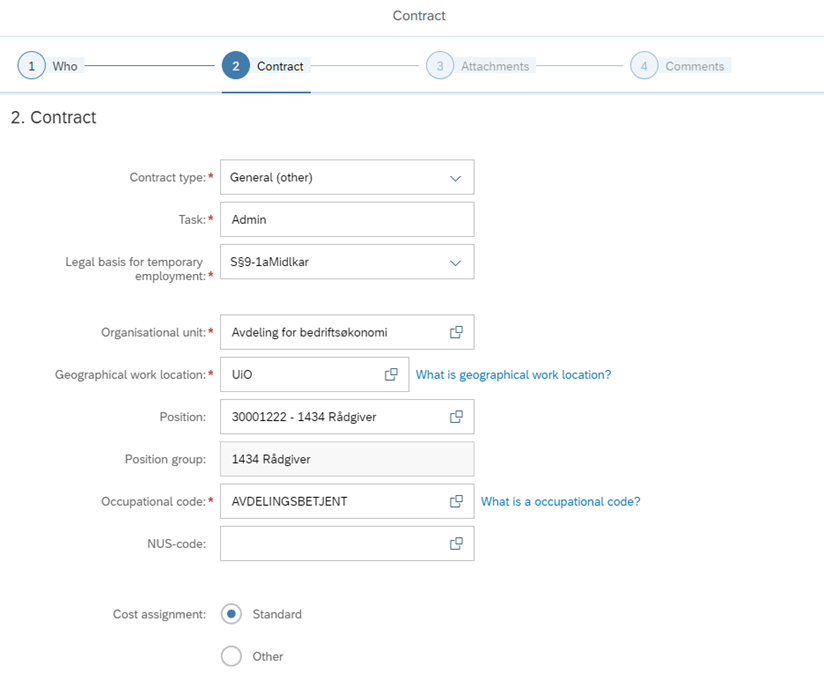
The field "Contract type" has a drop-down menu with several options and will decide the employee group (EG) and employee subgroup (ES). See DFØ Brukerdokumentasjon - Tilsetting og arbeidskontrakt (in Norwegian only) for an overview of the various combinations.
If you select contract type "Teaching", the field "Course code" will appear. This is a text field where the course code is entered.
The field "Task" is a free-text field where the task can be entered. In the field "Legal basis for temporary employment" you register the legal basis for the employment from a drop-down menu.
The "Organisational unit" field shows all organisational units you have access to. This field is determined by your authorisation (A290). Click the arrows to navigate the organisational chart.

When you select an organisational unit, a list of all positions in the selected organisational unit that are active during the contract period will appear. In the "Employees" column, the number of people employed in the position is displayed.
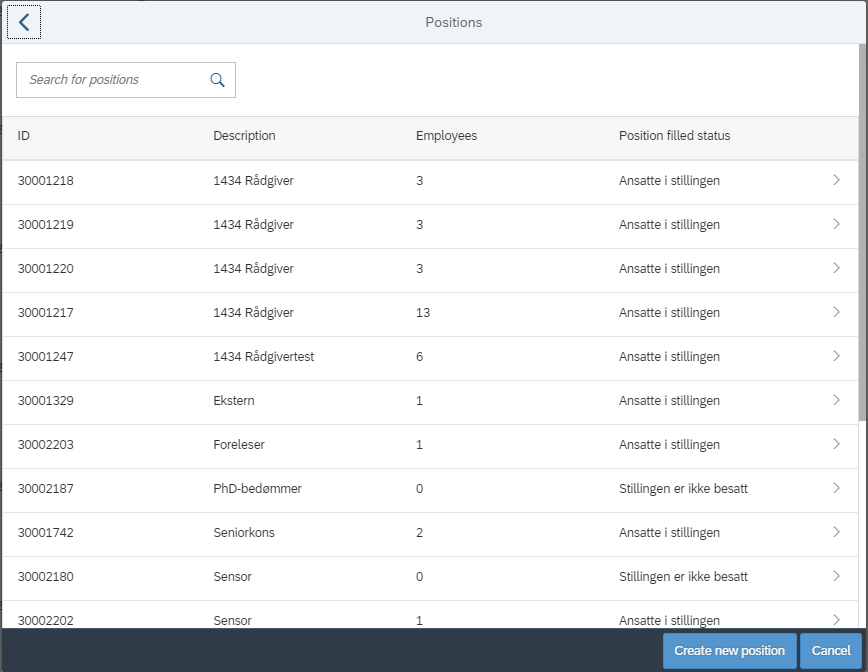
You can also create a new position by clicking “Create new position”. Enter the position title, position fund source, position category, position group and job code. Click "Save" when the required fields are filled in.
The image shows creating a new position.
The fields "Geographical work location", "Position" and "Occupational code" are updated with information from the position and organisational unit. You can enter the employee's education code in the "NUS-code" field. This code will be posted in IT0022 Education in the payroll system.
If the "Cost allocation" field is set to "Standard", the cost allocation from the position will be registered in the contract. This can be changed by checking "Other". The information entered in these fields will be posted in IT0027 Cost Distribution in the payroll system.
If the contract was originally created by an orderer, and the orderer has registered a different cost allocation, the cost allocation field will be pre-filled with "Other". When you register or change the organisational unit and/or position, it will not change the cost allocation registered by the orderer. In cases where the contract is to follow the standard allocation for the selected organisational unit and/or position, you must revert the cost allocation back to standard.
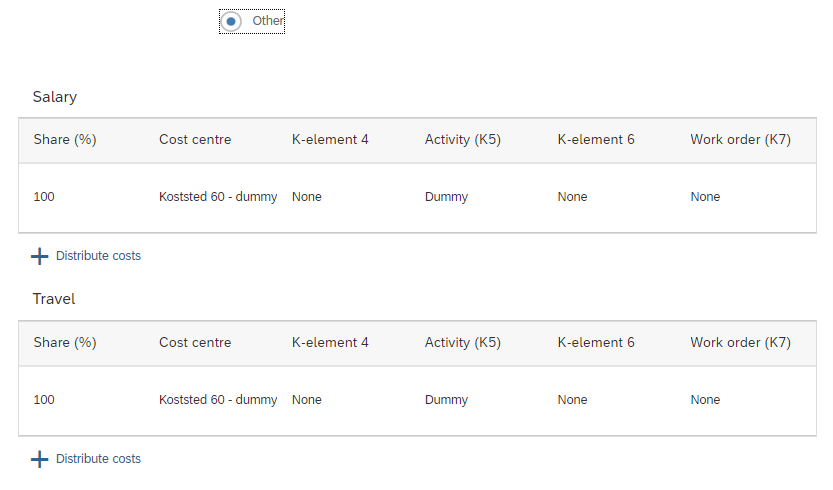
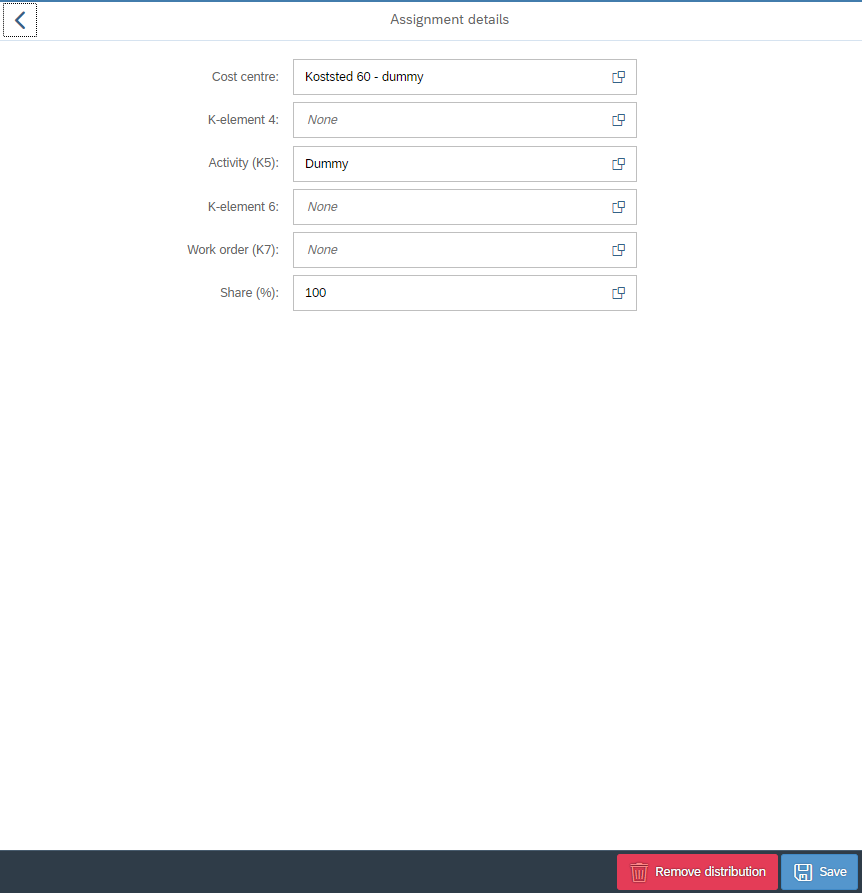
To change the cost allocation, click on the relevant line, either salary or travel. Additionally, the costs can be distributed among several by clicking the "+ Distribute costs" button. Enter the desired distribution and click the "Save" button at the bottom right. You can also delete the distribution by clicking the "Remove distribution" button. This sets the cost allocation back to standard for the selected organisational unit. To go back, click the arrow to the top left.
The following fields change and adapt depending on whether the selected position is on a pay ladder or range.
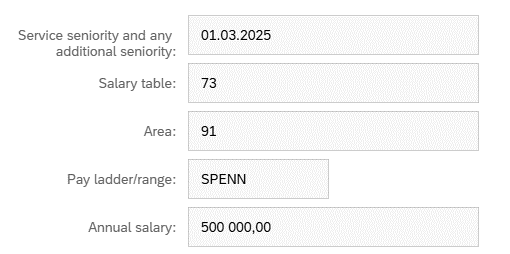
Position on range (spenn)
- Service seniority and any additional seniority: First day of the starting month of the contract (automatically filled and editable).
- Salary table: 73 (automatically filled and not editable).
- Area: 91 (automatically filled and not editable).
- Pay ladder/range: SPENN (automatically filled and not editable).
- Annual salary: Caseworker fills in the annual salary.
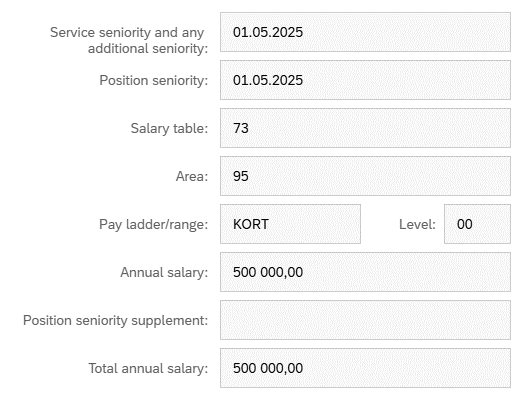
Position on pay ladder
- Service seniority and any additional seniority: First day of the starting month of the contract (automatically filled and editable).
- Position seniority: First day of the starting month of the contract (automatically filled and editable).
- Salary table: 73 (automatically filled and not editable).
- Area: 95 (automatically filled and not editable).
- Pay ladder/range (after 01.05.2025): KORT, LANG or STIGE2 (automatically filled and not editable).
- Pay ladder/range (before 01.05.2025): STIGE1 or STIGE2 (automatically filled and not editable).
- Level: Number of years on the ladder (automatically filled based on the date of position seniority).
- Annual salary: Caseworker fills in the annual salary.
- Position seniority supplement (after 01.05.2025):
- KORT: Supplement of 1,1 % (level 1-10)
- LANG: Supplement of 1,1 % (level 1-10), and 0,55 % (level 11-16)
- STIGE2: Supplement of 3 % (level 1-4)
- Position seniority supplement (before 01.05.2025):
- STIGE1: Supplement of 1,1 % (level 1-10)
- STIGE2: Supplement of 3 % (level 1-4)
- Total annual salary: Annual salary plus any position seniority supplement (automatically filled and not editable).
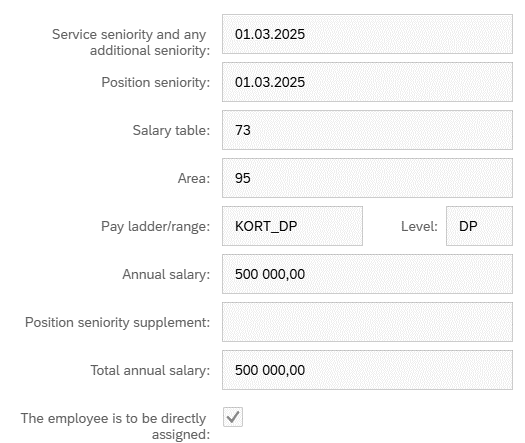
Directly assigned (when "The employee is to be directly assigned" is checked)
- Service seniority and any additional seniority: First day of the starting month of the contract (automatically filled and editable).
- Position seniority: First day of the starting month of the contract (automatically filled and editable).
- Salary table: 73 (automatically filled and not editable).
- Area: 95 (automatically filled and not editable).
- Pay ladder/range: KORT_DP or LANG_DP (automatically filled and not editable).
- Level: DP (automatically filled and not editable).
- Annual salary: Caseworker fills in the annual salary.
- Position seniority supplement: Field is blank (not editable).
- Total annual salary: Same as the "Annual salary" field (automatically filled and not editable).
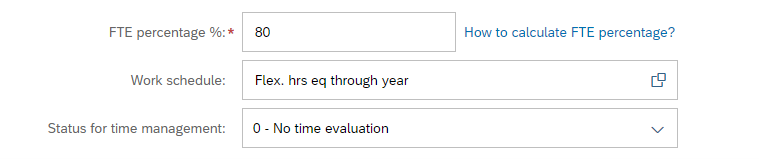
In the "FTE percentage %" field you register the position percentage for the contract. There is an information box to help calculating the position percentage. The fields for "Work schedule" and "Status for time management" are pre-filled with standardised values. You can change these by clicking the field and selecting a value from the menu. The "Status for time management" field determines whether the employee should register their time or not.
- No time evaluation: The employee does not register working hours.
- Time evaluation of actual times: The employee registers working hours in the usual way.
- Time evaluation without payroll integration: The employee does not register time but has access to certain quotas.
- Time evaluation of planned times: Time registration is automatically filled with expected working hours, and only deviations are registered.
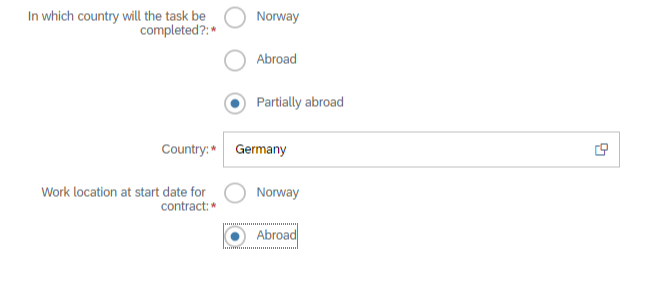
You must also decide which country the work will be performed in. If you select "Abroad", a new field will appear where you must choose the country. If you check "Partially abroad", you must also decide which country the work starts in, either Norway or abroad. This affects whether the employee is hired as a foreign worker in SAP or not.
If the orderer has provided information about the work country, one of the bullet points under the question "In which country will the task be completed" and the "Country" field will be pre-filled. The bullet points for "Work location at start date for contract" will not be pre-filled by the orderer, as the orderer does not receive this question in the form.
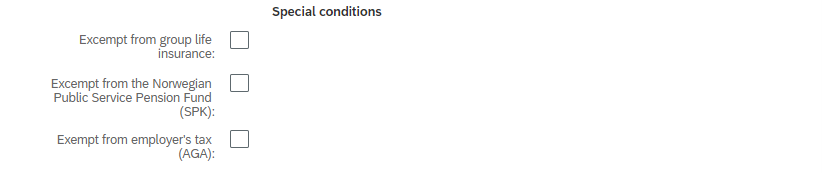
At the bottom of the page, you can choose whether the employee should be exempt from group life insurance, the Norwegian Public Service Pension Fund (SPK) or employer’s tax (AGA). This affects the registration in IT0001, IT0008, and IT0014.
- If you check "Exempt from group life insurance" the group life insurance will not be registered in IT0014.
- If you check " Exempt from the Norwegian Public Service Pension Fund (SPK)" wage type 7000 will not be registered in IT0008. The contract will also go through a manual control for correction of the employee subgroup.
- If you check " Exempt from employer's tax (AGA)" other wage types will be registered in IT0008.
When all information has been registered, click the "Step 3" button to the bottom left to proceed.
Step 3 – Attachments
In Step 3 you can upload attachments by clicking the "+ Add attachment" button. Additionally, there is a free-text field for the contract. What you write here will be included in the actual contract that is sent for signing.
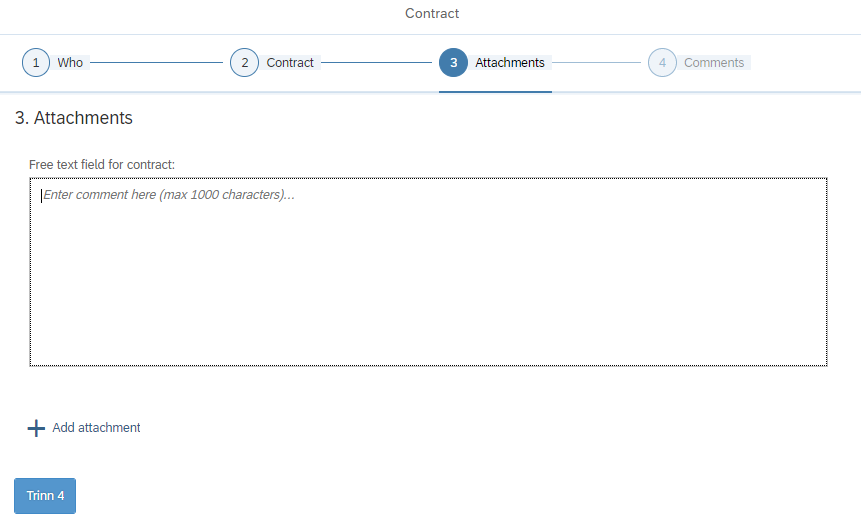
Click the button "Step 4" to proceed.
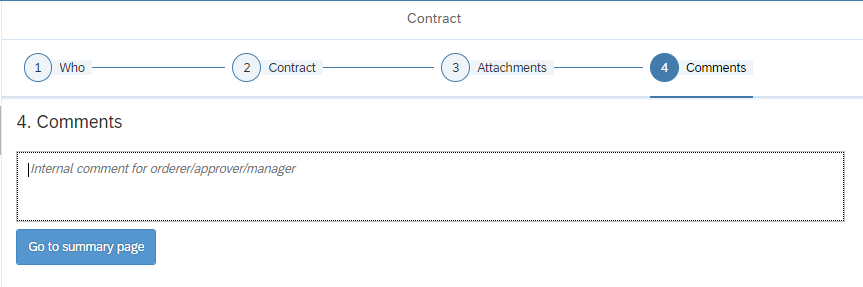
Step 4 – Comments
In step 4 you can leave a comment for the next processor in the workflow, the manager with budget allocation authority.
If the orderer has included an internal note in their proposal, it will be shown under the free-text field.
See summary page and submit
Once you have entered the necessary information in the contract, click the "Go to summary page" button in the last step. A summary of what has been registered in the various steps will then appear. If anything needs to be changed, you can click "Edit" for each step. If you click "Edit" you must search for the employee again.

To the bottom of the summary there is a button called "Display contract". Clicking this brings up a draft of the contract that will be sent for signing after the manager approves the financial framework of the contract. It is important to review this before submitting the contract for approval.
To submit the contract, click the "Submit" button to the bottom right. A confirmation box will appear, where you must click "Submit". The form will be sent to a processor with budget allocation authority.
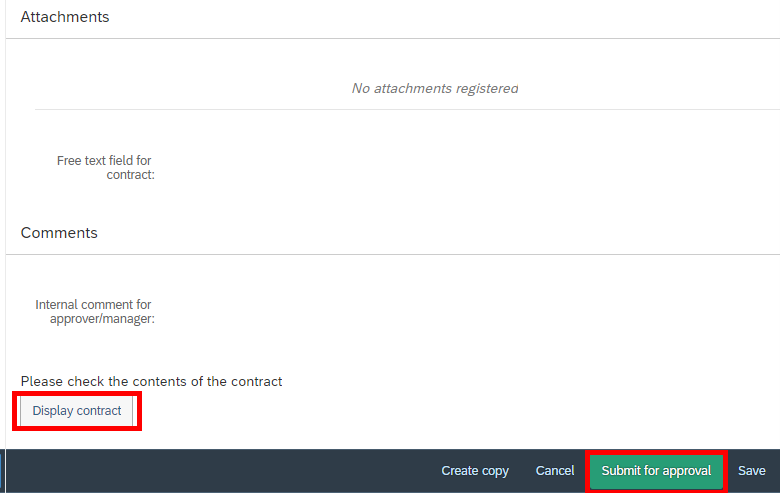
If you have created the contract without an order, you can save the draft and continue with the form later by clicking "Save". To cancel the registration, click "Cancel". You can also create a copy of the form by clicking "Create copy". It is recommended to submit the form before copying to ensure that data is not lost.
Contact
Do you have questions about the content of this page?
Contact our customer service centre
- lonn [at] dfo.no (lonn[at]dfo[dot]no)
- (+47) 40 63 40 21